
Debug Snap Applications
Important
Before you start
This how-to guide builds on concepts from Tutorial 2: Packaging complex robotics software with snaps. While it’s strongly advised to have followed this tutorial before starting, it is not mandatory to proceed with this guide.
This guide assumes you have a basic understanding of snaps. If you are new to snaps, you can learn more about them in the Snap documentation.
When developing a snap, things can go wrong. In this how-to guide, we will explore some common ways to debug a snap.
Starting from the results of Tutorial 2: Packaging complex robotics software with snaps, we will now use a modified source code with intentional errors to learn how to debug and fix issues in our snaps.
The first step is to clone the specific branch containing
the modified source code as described in the setup section below.
Since the build of the snap itself can go wrong.
Snapcraft offers multiple ways to introspect the instance state and files.
The Explanation Documentation: Debug snap build,
is a great place to learn about this.
When the build went right and this is the run-time that is causing issues,
snap also offers multiple ways to debug it.
The Explanation Documentation: Debug a snap application,
is a great place to learn about this.
Setup
Clone the debugging-tutorial branch of the turtlebot3c-snap
repository.
This branch contains the modified source code with intentional errors.
git clone -b debugging-tutorial https://github.com/canonical/turtlebot3c-snap.git
cd turtlebot3c-snap
Your folder should have the following structure:
.
├── README.md
├── renovate.json
├── snap
│   ├── hooks
│   │   ├── configure
│   │   └── install
│   ├── local
│   │   ├── core_launcher.sh
│   │   ├── install_last_map.sh
│   │   ├── mapping_launcher.sh
│   │   ├── mux_select_joy_vel.sh
│   │   ├── mux_select_key_vel.sh
│   │   ├── mux_select_nav_vel.sh
│   │   ├── navigation_launcher.sh
│   │   ├── ros_network.sh
│   │   └── save_map.sh
│   └── snapcraft.yaml
└── turtlebot3c.rosinstall
Debug the core application
Testing our TurtleBot3 snap will be the perfect opportunity to apply the different debugging approaches.
Before performing any test we need our actual snap. Although now it should be clear how to build our snap, let’s see how.
First run of our snap
To build our snap,
we must be located at the root of our directory next to our snap/ folder.
Then we simply run the command:
snapcraft
This will take some time but after some time we must get the file turtlebot3c_*.snap.
Install this snap with the following command:
sudo snap install turtlebot3c_*.snap --dangerous
And that’s it.
Our snap is installed and since our core and teleop apps are daemons,
they must be already running!
Let’s inspect the logs to see what is going on.
sudo snap logs turtlebot3c.core -n 100
And we get the following output:
turtlebot3c.core[88370]: </font>RLException: while processing /snap/turtlebot3c/x1/opt/ros/noetic/share/turtlebot3_bringup/launch/turtlebot3_robot.launch:
turtlebot3c.core[88370]: while processing /snap/turtlebot3c/x1/opt/ros/noetic/share/turtlebot3_bringup/launch/turtlebot3_lidar.launch:
turtlebot3c.core[88370]: Invalid tag: environment variable 'LDS_MODEL' is not set.
turtlebot3c.core[88370]: Arg xml is
turtlebot3c.core[88370]: The traceback for the exception was written to the log file

turtlebot3c.core[88370]: ... logging to /root/snap/turtlebot3c/x1/ros/log/fdf740ce-b920-11ed-a4a0-e5f11893ed73/roslaunch-workshop-part2-88370.log
turtlebot3c.core[88370]: Checking log directory for disk usage. This may take a while.
turtlebot3c.core[88370]: Press Ctrl-C to interrupt
turtlebot3c.core[88370]: Done checking log file disk usage. Usage is <1GB.
Turtlebot3c.core[88370]:
systemd[1]: snap.turtlebot3c.core.service: Main process exited, code=exited, status=1/FAILURE
systemd[1]: snap.turtlebot3c.core.service: Failed with result 'exit-code'.
systemd[1]: snap.turtlebot3c.core.service: Scheduled restart job, restart counter is at 5.
systemd[1]: Stopped Service for snap application turtlebot3c.core.
systemd[1]: snap.turtlebot3c.core.service: Start request repeated too quickly.
systemd[1]: snap.turtlebot3c.core.service: Failed with result 'exit-code'.
systemd[1]: Failed to start Service for snap application turtlebot3c.core.
The environment variable 'LDS_MODEL' is not set. is the guilty part.
The LDS model is the model of LIDAR that is used by the TurtleBot3.
The TurtleBot3 can work with two different LIDAR models, LDS-01 and LDS-02.
The LIDAR model is read directly from an environment variable by the launch file.
So we will have to read the snap configuration and
simply export it as an environment variable.
We will need an lds-model configuration.
We already set two configurations so nothing new here. Let’s add this additional configuration.
LIDAR configuration
We will first add our configuration to our different hooks,
and then use the configuration in our core_launcher.sh script.
Hooks
First, let’s define the default value for our configuration lds-model.
Let’s add our configuration to the snap/hooks/install file:
snapctl set simulation=false
+# set default lidar model for real robot
+snapctl set lds-model=LDS-01
Similarly to the simulation configuration we will also complete the snap/hooks/configure:
+LDS_MODEL="$(snapctl get lds-model)"
+case "$LDS_MODEL" in
+  "LDS-01") ;;
+  "LDS-02") ;;
+  *)
+    >&2 echo "'$LDS_MODEL' is not a supported value for lds_model." \ "Possible values are LDS-01 and LDS-02"
+    return 1
+    ;;
+esac
# restart core and teleop on new config
snapctl stop "$SNAP_INSTANCE_NAME.core"
snapctl stop "$SNAP_INSTANCE_NAME.teleop"
Now, our hooks are correctly handling the lds-model configuration.
Nothing new here;
we applied the same method as for the turtlebot3-model configuration.
Use the configuration
Now let’s use the configuration within our TurtleBot3 snap.
Let’s do so by modifying the file snap/local/core_launcher.sh:
#!/usr/bin/bash
[...]
TURTLEBOT3_MODEL="$(snapctl get turtlebot3-model)"
+LDS_MODEL="$(snapctl get lds-model)"
[...]
+export LDS_MODEL
${SNAP}/opt/ros/noetic/bin/roslaunch turtlebot3c_bringup turtlebot3c_bringup.launch simulation:=$SIMULATION
Now, when the core daemon is going to start it will use the lds-model configuration
in the launch file.
Since we already installed our snap, we must set a value manually here:
sudo snap set turtlebot3c lds-model=LDS-02
We can now rebuild the snap and reinstall it. Once reinstalled we can now set the proper configuration:
sudo snap set turtlebot3c lds-model=LDS-01
Roscore tend to stay alive sometime,
so make sure no roscore is running when you have stopped the snap.
roscore zombies create unsupported behaviour.
Teleoperate the Turtlebot3
We just fixed the previous issue regarding the lds-model.
It’s now time to see if the core daemon is now running properly.
Let’s check again the logs now that we fixed the LIDAR model issue:
systemd[1]: Started Service for snap application turtlebot3c.core.
turtlebot3c.core[101438]: [ERROR] [1677843362.232445761]: An exception was thrown: open: No such file or directory
turtlebot3c.core[101437]: [ERROR] [1677843362.654190]: Error opening serial: [Errno 2] could not open port /dev/ttyACM0: [Errno 2] No such file or directory: '/dev/ttyACM0'
Our application cannot access the USB port. There are multiple reasons for that.
First, we declared the raw-usb interface but didn’t connect it.
We can verify that with:
$ snap connections turtlebot3c

Interface  Plug          Slot   Notes
Joystick  turtlebot3c:joystick    -    -
network   turtlebot3c:network    :network   -
network-bind  turtlebot3c:network-bind  :network-bind -
raw-usb      turtlebot3c:raw-usb    -       -
The raw-usb plug has no slot assigned.
This is because it’s not connected.
raw-usb is not auto-connect, so it has to be connected manually.
We can connect it with:
sudo snap connect turtlebot3c:raw-usb
Not that once you have connected a plug on a device for a given snap
you won’t have to do it again (even over the updates).
And we can check the result with the snap connections command:
$ snap connections turtlebot3c

Interface  Plug          Slot     Notes
Joystick  turtlebot3c:joystick    -      -
network   turtlebot3c:network    :network     -
network-bind  turtlebot3c:network-bind  :network-bind   -
raw-usb      turtlebot3c:raw-usb       :raw-usb    manual
We can restart our application with the
sudo snap restart turtlebot3c.core command and check the logs.
Unfortunately, we will see the error again,
because we are not running on the real robot.
We must change the snap configuration simulation to run the simulation mode.
sudo snap set turtlebot3c simulation=true
Now the logs look better:
systemd[1]: Started Service for snap application turtlebot3c.core.
turtlebot3c.core[102917]: xacro: in-order processing became default in ROS Melodic. You can drop the option.
We can now launch the simulation with:
TURTLEBOT3_MODEL=waffle_pi roslaunch turtlebot3_gazebo turtlebot3_world.launch
And in another terminal, we can teleoperate our robot with:
turtlebot3c.key
Alternatively, if we have a joystick we can test the turtelbot3c.joy.
Since our key application is already selecting the right topic we should be able to
fully control our robot with the keyboard.
This means that our core, teleop,
and at least key applications are working fine.
Now we can focus on our remaining applications.
Let’s see if our mapping is working fine.
Save the map in the correct location
Our mapping daemon is a rather complex snap application.
Indeed, we used various features of snaps to manage the saving of the map.
It’s time to verify if everything works as expected.
With our simulation running and our core and teleop daemons running in
the background we will simply need to run turtlebot3c.key to control our robot,
but also we will need to start the mapping service.
To do so we can start the service (without enabling it) with:
sudo snap start turtlebot3c.mapping
We can then follow the logs of our application with the command:
sudo snap logs turtlebot3c.mapping -f
The logs should be similar to this:
turtlebot3c.mapping[104495]: Laser Pose= -1.65701 -0.499409 -3.13914
turtlebot3c.mapping[104495]: m_count 9
turtlebot3c.mapping[104495]: Average Scan Matching Score=303.733
turtlebot3c.mapping[104495]: neff= 100
turtlebot3c.mapping[104495]: Registering Scans:Done
This is what the normal log of the mapping should look like.
In case it’s not the case we must stop the simulation and
the snap to make sure there is no roscore zombies.
We can then use our key application to move around and create the map!
Once we moved around, the SLAM should have enough data to generate the map. We can test our “smart map saving” feature by simply stopping the map and seeing if it’s created.
We can stop the map with:
sudo snap stop turtlebot3c.mapping
We should see at the end of our mapping logs something similar to:
turtlebot3c.mapping[104749]: Waiting for the map
turtlebot3c.mapping[104749]: Received a 384 X 384 map @ 0.050 m/pix
turtlebot3c.mapping[104749]: Writing map occupancy data to /root/snap/turtlebot3c/common/map/new_map.pgm
turtlebot3c.mapping[104749]: Writing map occupancy data to /root/snap/turtlebot3c/common/map/new_map.yaml
turtlebot3c.mapping[104749]: Done
What we see in the logs is rather positive since the logs report that the map was saved.
Recall that we decided to save the map in the directory ${SNAP_USER_COMMON}/map.
In this case, our user is ubuntu,
and the SNAP_USER_COMMON should be pointing to /home/ubuntu/snap/turtlebot3c/common.
But here we can see that the map was saved in
the directory: /root/snap/turtlebot3c/common/.
Let’s check why that is.
Where is my map?
When we call a snap application command,
the command is executed with the permission of our current user.
In case the user is ubuntu,
calling the command MY_SNAP will run the command with the ubuntu permissions.
This also means that if we call sudo MY_SNAP we will
run our command with the root permissions.
From that point of view, nothing is different with snaps.
One thing to know is that snap daemons are running as root.
This will obviously have some impact.
Let’s jump inside our snap environment and verify some things.
We can start a shell in the snap daemon environment with the following command:
sudo snap run --shell turtlebot3c.mapping
We will then enter a shell.
Let’s go to the root of our snap system.
cd $SNAP
Simply by running the ls command, we might recognize a typical Linux system:
etc/ lib/ meta/ opt/ snap/ usr/ var/
We can even see our ROS install inside opt/ros/noetic/.
If we check the content of the $HOME environment variable we will see:
$ echo $HOME

/root/snap/turtlebot3c/x
So the home of our snap when run as root is this specific directory.
We can run:
echo $SNAP_USER_COMMON
As we can guess it will give the value:
/root/snap/turtlebot3c/common
And this is where our maps are saved. This then explains the location of our map.
It’s simply saved in our root user home since we are running a daemon.
We can exit this terminal by typing exit.
Back to our machine, we can verify that our maps are present with the command:
ls -l /root/snap/turtlebot3c/common/map
We can see our map files as well as our symbolic link.
Our mapping application was then perfectly working.
In the future we might want to be careful regarding the $SNAP_* variable since
they might point to different directories depending on
the user or if it’s a daemon or not.
Let’s now see if the navigation works!
Fix the navigation application
The mapping application successfully created map files.
Let’s see if our navigation application starts and loads the correct files.
We will still need the simulation up and running.
Let’s keep the logs in a dedicated terminal by typing:
sudo snap logs turtlebot3c -f
We can then start our navigation service with:
sudo snap start turtlebot3c.navigation
Then we can see that something is going wrong. We get this log:
systemd[1]: Started Service for snap application turtlebot3c.navigation.
turtlebot3c.navigation[106426]: prev_topic: "/nav_vel"
turtlebot3c.navigation[106455]: /snap/turtlebot3c/x2/opt/ros/noetic/lib/map_server/map_server: error while loading shared libraries: libpulsecommon-13.99.so: cannot open shared object file: No such file or directory
A shared library is missing. It’s libpulsecommon.
A missing library in a snap is a very common problem when building a snap.
Let’s stop our application since anyway it’s crashing:
sudo snap stop turtlebot3c.navigation
Let’s debug our application to give an overview of how to debug such cases.
Debug the missing libpulsecommon library
Our application is crashing because of a missing shared library. This is a very common problem in snaps since the confined environment only contains what was explicitly declared. Let’s quickly jump into our application environment to verify what is going on:
sudo snap run --shell turtlebot3c.navigation
We are now in the exact same condition that
our snap is right before calling navigation_launcher.sh.
Let’s see if our map_server application is missing a library.
We can do so by typing:
ldd /snap/turtlebot3c/current/opt/ros/noetic/lib/map_server/map_server
Here we are using ldd to print the shared object dependencies.
We can then see that in the middle of all the different links and found libraries we have:
libpulsecommon-13.99.so => not found
So our map_server is depending on a library libpulsecommon that it cannot find.
Let’s see if we can find this missing library inside our snap.
Type the following command:
find $SNAP -type f -name "libpulsecommon-13.99.so"
It will search for the library file that
our map_server is not finding inside our snap.
Surprisingly, we find it in our snap:
/snap/turtlebot3c/x2/usr/lib/x86_64-linux-gnu/pulseaudio/libpulsecommon-13.99.so
This means that our library is installed already in our snap, just that our application is not finding it.
Now we must verify why our library is not found while being present in our snap.
On Linux, like in a snap,
there are several mechanisms used to search for a dynamic library.
The most common is the $LD_LIBRARY_PATH environment variable.
If we run:
echo $LD_LIBRARY_PATH
we will see that $SNAP/usr/lib/x86_64-linux-gnu/ is listed but
not with the subdirectory pulseaudio.
We can now exit this snap shell by typing exit.
The simplest solution would be to extend the $LD_LIBRARY_PATH environment
variable with the additional directory.
To do that we must modify our snapcraft.yaml:
  navigation:
+  environment:
+    # map server need pulseaudio
+    LD_LIBRARY_PATH: "$LD_LIBRARY_PATH:$SNAP/usr/lib/x86_64-linux-gnu/pulseaudio"
   command-chain: [usr/bin/mux_select_nav_vel.sh]
The environment keyword lets us define environment variables for our application.
Here we extend the $LD_LIBRARY_PATH with
the additional pulseaudio path relative to our snap.
We can now rebuild and reinstall the snap!
At the end of the build we will see this warning:
CVE-2020-27348: A potentially empty LD_LIBRARY_PATH has been set for environment in 'navigation'. The current working directory will be added to the library path if empty. This can cause unexpected libraries to be loaded.
In our case,
we can ignore this warning since we set the $LD_LIBRARY_PATH to a non-empty value.
We can now retest the navigation application.
Navigation test
Once our snap is properly rebuilt and reinstalled we can test our navigation app.
With our last modification, our application should now find every library it needs.
We must make sure to restart the simulation after reinstalling the snap.
Once up and running, let’s run the navigation again:
sudo snap start turtlebot3c.navigation
This time we will see that the logs look fine.
We can then run rViz and see if we can navigate.
RViz is a debug/visualization tool, so it doesn’t have to be included inside our snap.
We can run rViz with the TurtleBot3 configuration with the following command:
rviz -d /opt/ros/noetic/share/turtlebot3_slam/rviz/turtlebot3_gmapping.rviz
We should see something like this:
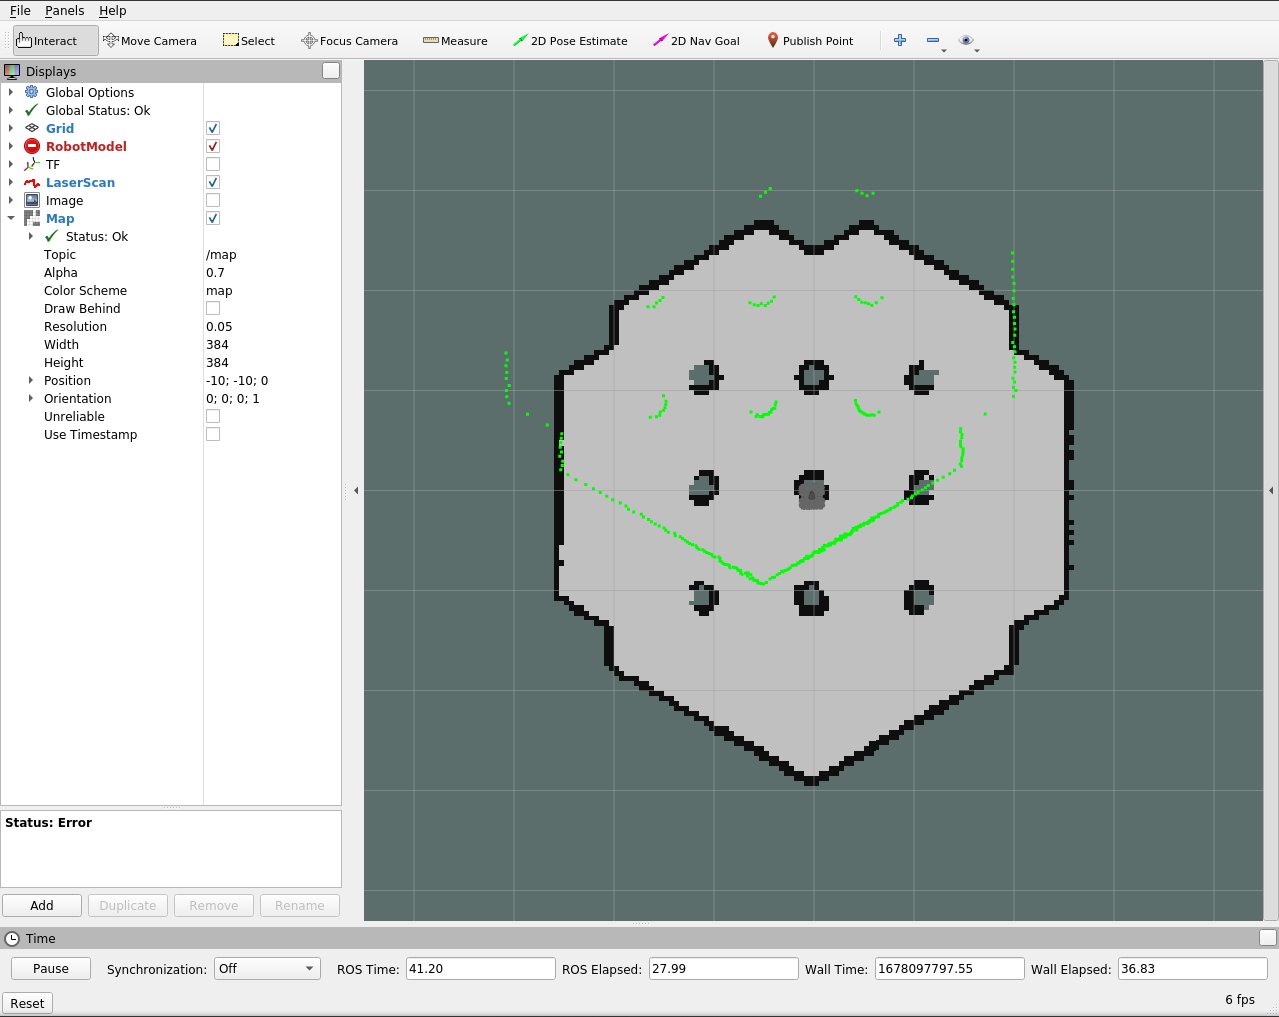
Let’s select the “2D Pose Estimate” and select the actual position:
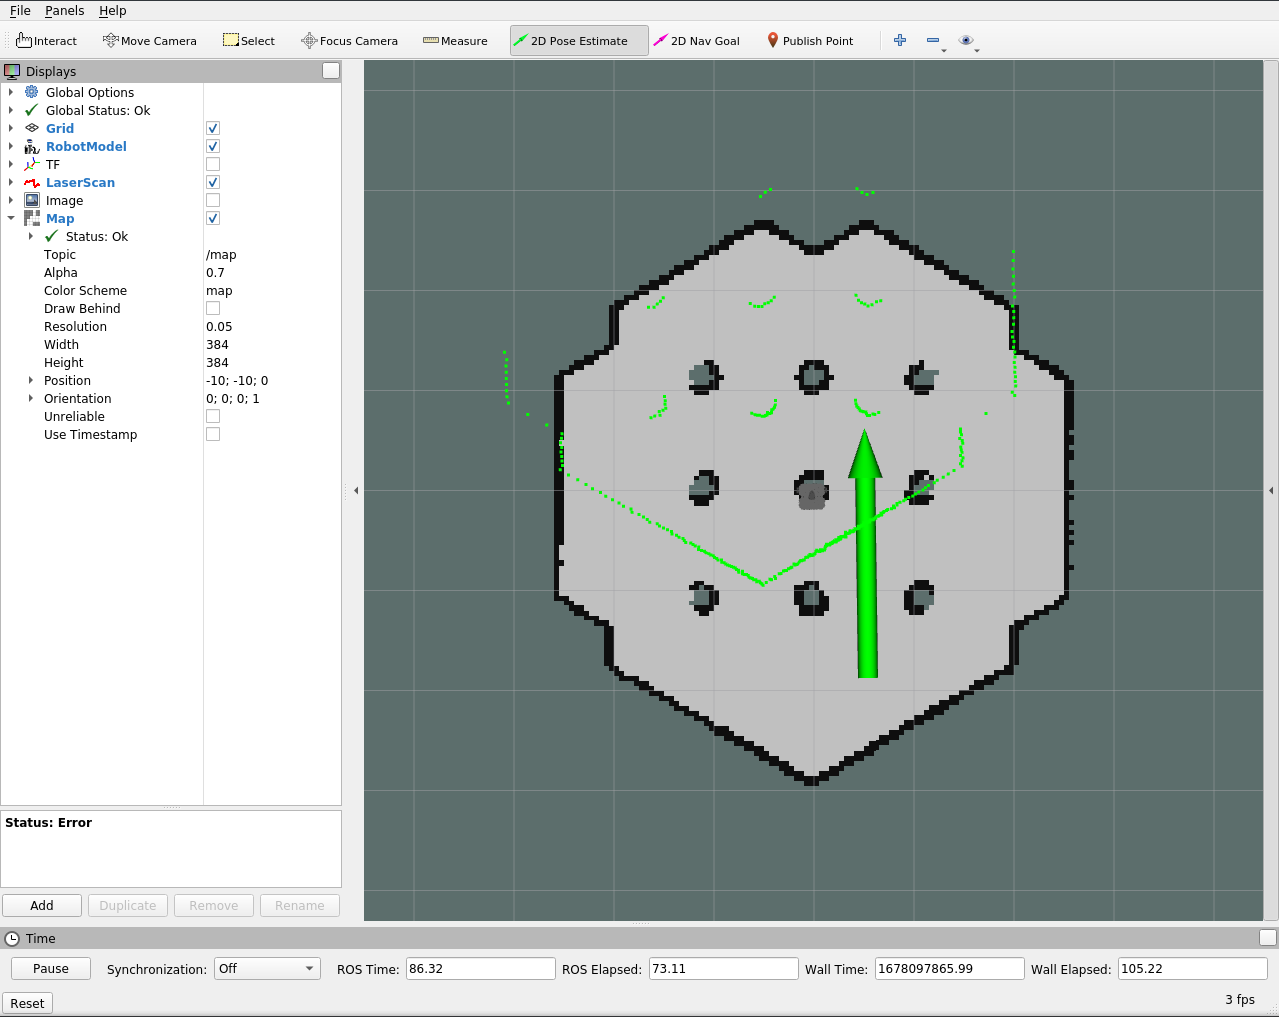
We can now check with the “2D Nav Goal” to send a goal to our navigation:

Our robot is now navigating.
This means that the navigation daemon is running properly but
also that our core and teleop daemons are also working fine.
Now our whole software stack is running!
Final detail
We have now tested our whole stack and every feature was properly working. There is still a final detail to look at before we run a final test.
During the test we could have noticed this warning
in the mapping and navigation logs:
[rospack] Warning: cannot create rospack cache directory /root/.ros: boost::filesystem::create_directory: Permission denied: "/root/.ros"
Rospack doesn’t use the $HOME environment variable but
uses the password structure to get the home directory.
By default, snaps make sure that the environment variable $HOME is pointing to
a writable directory, but unfortunately, rospack is not using it.
The good news is that rospack
first tries to read the $ROS_HOME.
We could make the error disappear by defining the $ROS_HOME to $SNAP_USER_DATA/ros.
Since ROS logging is also using $ROS_HOME too,
to have the logs of every app and daemon in the same directory we will apply
the environment variable change to every app and daemon.
We can do that by modifying the snapcraft.yaml:
  core:
+   environment:
+     ROS_HOME: $SNAP_USER_DATA/ros
[...]
  teleop:
+   environment:
+     ROS_HOME: $SNAP_USER_DATA/ros
[...]
  joy:
+   environment:
+     ROS_HOME: $SNAP_USER_DATA/ros
[...]
  key:
+   environment:
+     ROS_HOME: $SNAP_USER_DATA/ros
[...]
  mapping:
+   environment:
+     ROS_HOME: $SNAP_USER_DATA/ros
[...]
  navigation:
    environment:
+   ROS_HOME: $SNAP_USER_DATA/ros
We can then rebuild our snap!
By solving this last little detail, we made sure that all the logs are written properly and in the same location. Snaps rely on the standard usage of Linux. Any solution not following the standard might need adjustment.